Wednesday, January 27, 2010

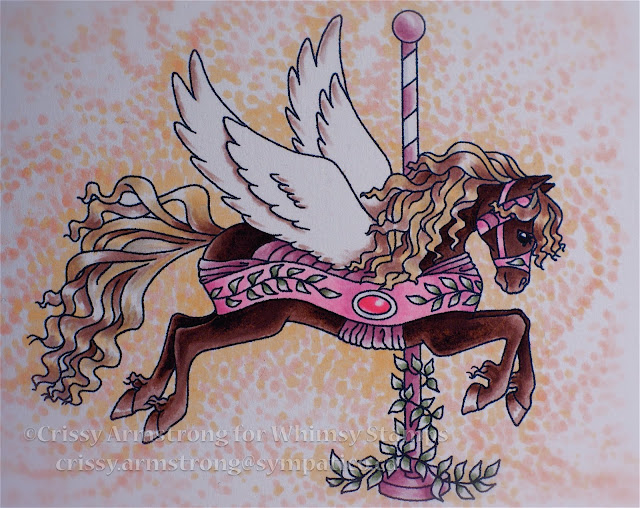
Wings of Hope for Haiti


There is still lots of time to enter my huge blog candy give-away with tons of RUBBER STAMPS and other prizes from SEVEN stamp companies PLUS, a set of COPICS, a MS PUNCH, and a SPELLBINDER DIE! Please scroll down to the post below this one for the details!
And don't forget, all proceeds from the sale of this digital image, "Wings of Hope" (minus the Paypal fees) are going to help the Red Cross disaster relief in Haiti.  For only $4.00,  you get an image you can use, and you help Haiti with their recovery from the massive earthquake!  Click here to purchase it from the Whimsy store.
I coloured "Wings of Hope" with the following Copics:
W1, 2, 3, 5, 7
E50,
R000, 00
R27, 59
B21, 41,
G82,
BG0000, 000, 10, 11, 13, 96
FBG2
After colouring with Copics, I used white acrylic paint to add spots on the horse and feathers on the wings.
I covered the entire image with two coats of Ultra Thick Embossing Powder.
Thanks to so many people who have purchased this image already, we have raised over seven hundred dollars so far!  Let's keep it going! If you wish to help spread the word, please grab my blinkie or button from my sidebar and post it on your blog.  And don't forget to leave a comment on my blog candy post for your chance to win one of two prize packages!
Bless you, and thank you for visiting today!


Saturday, January 23, 2010

HELP FOR HAITI BLOG CANDY GIVE-AWAY!

Help For Haiti Blog Candy
Blog candy will be open from Sat. Jan 23 through Sat Feb. 6th.  However, I may extend the deadline if people are still responding after two weeks.


wings of hope colored


How would you like reach out to the people of Haiti, and at the same time get your name in the draw for a HUGE blog candy give-away?  Read on…

I asked Denise of Whimsy Stamps if I could design a special carousel horse (pictured above) that we could use to raise funds for Haiti.  She graciously agreed!  And so I drew this carousel angel horse with wings, and we have called it, “Wings of Hope”.   From now until the end of February 2010, this limited edition digital image will be available to purchase, exclusively in Whimsy’s online shop.   Whimsy has agreed to donate all proceeds from the sale of this stamp, minus the Paypal fees to the American Red Cross disaster relief fund for Haiti.  Please click on this link if you wish to purchase it.  Be sure to scroll down the page on that link to see some gorgeous samples that the Whimsy Design Team has already made with this stamp.  I just finished drawing it Thursday night, and they have samples made already! You go girls!! 


And now about the prizes...
I have two prize packages that will be up for grabs in my “Help For Haiti Blog Candy contest”.  A second place prize, and a GRAND prize.  Once this contest ends, I will choose two random winners through Random Integer Generator.org.
No less than SEVEN well-known stamp/craft companies have donated generously to the prizes I will be giving away!
Take a look at what you could WIN!!!


GRAND PRIZE PACKAGE WILL INCLUDE:

DSC01151
These beautiful images from Whiff of Joy by artist Elizabeth Bell:


Your choice of four digi stamps from:
These beautiful brass stencils from A Touch of Grace Paper Boutique:


"Cool Ride" stamp set from Whimsy Stamps (pictured is a sample only - the prize is a deeply etched red rubber stamp set):
blue and white
Your choice of four of my Squigglefly images (pictured is a sample, and images are sold as black and white digital image only, no color)
Ellie Christmas close


GRAND PRIZES LISTED:
 

A set of TWELVE COPIC MARKERS! Ex 3 colors

Spellbinders Shapeabilities “Create A Flake Two”

Martha Stewart edge punch “Embossed Petals”

Fall Stamp Kit from Whiff of Joy - includes 8 full size rubber stamp images by Elizabeth Bell and 6 matching sentiments

AND my friend Christine Dark of Sketching Stamper Digistamps is also donating four beautiful digital images that she herself illustrated and you get to choose which ones (believe me, it is going to be hard to narrow it down)!

PLUS two very gorgeous brass stencils from my friend Jerry Kay of A Touch Of Grace

From the wonderful companies I illustrate for:

Wags ‘n Whiskers rubber stamp, “He Loves me”

Kraftin’ Kimmie rubber stamp, “Bird Fairy”

Whimsy Stamps carousel horse set, “Cool Ride” (comes with two matching accessory images)

Plus you can choose any four of my digital images from Squigglefly


SECOND PLACE PACKAGE INCLUDES:

Untamed Love stamp set from Whimsy Stamps (pictured is a sample only - the prize is a deeply etched red rubber stamp set):
untamed love closeup
Your choice of two of my Squigglefly images (pictured is a sample, and images are sold as black and white digital image only, no color)
DSC01058
SECOND PLACE PRIZE LIST:

Kraftin’ Kimmie “Branch Fairy” rubber stamp with matching sentiment

Wags ‘n Whiskers “Steal a Kiss” rubber stamp

Whimsy carousel horse set, “Untamed Love” (comes with two matching accessory images)

Plus you can choose any two of my digital images from Squigglefly


BLOG CANDY RULES OF ENTRY

1) You must make a financial donation to a charity that is helping Haiti at this time. If you have purchased “Wings of Hope” this counts as a donation! The 2 winners I choose will have to show me (via private e-mail) a copy of their donation receipt in order to collect their prize.

2) You must grab my “Help For Haiti” badge OR blinkie (both if you so choose, but only one is necessary) and post it on your blog’s SIDEBAR, linking people back to this blog post.  Posting it in your regular blog entry section will not count.  If you do not have a blog you may still enter this contest and you will be exempt from this rule.

3) Leave a comment on this post telling me the name of the charity organization you have recently supported, or that you have purchased “Wings of Hope” from Whimsy Stamps. I will post the names of the winners when this contest is over. 


4) The winners will need to contact me with their mailing address within a reasonable time frame (no more than a week or I will re-draw names). 


Contest is open to everyone!

Friday, January 22, 2010

Whimsy Snowball Fight is On! Blog Hop with Prizes to win!!


I've been hit!!
If you have hit me with a snowball from LISA's blog, your aim is perfect! If you have landed here randomly, duck, because you are in the middle of a snowball fight! ;-)
If you want to start at the beginning, go to DEB's blog.
There will be a $50.00 gift certificate for the winner of this fight, to be spent at the Whimsy store.  The winner will be chosen randomly off the Whimsy Blog, so be sure to go there and get your name in for the draw!  AND, three more winners will be chosen randomly from all the blogs in this hop, so leave comments on every one to increase your chances!  Each of those three winners will get one of the newly released Snickerdoodle Kids stamps that I have illustrated for Whimsy!
On my card I feature Janice, and the stamp is called "Ready, Set, Duck!"
I coloured her with the following Copics:
Face: E00, 11, R22
Snowsuit and pink in scarf: RV10, 11, 91, 93
Boots: E51, 55
Hair: E50, 51, 55
Blue and green on hat, mitts and scarf:  B21, YG11, 13
Snow: B60, 63
Background: B21, B00, 000,0000
B21 and blender pen on white trim
Edges sponged with Faded Lipstick Distress Ink

I covered the whole main panel with Versamark Clear Ink and embossed twice with Ultra Thick Embossing Powder.
Cuttlebug "Ornamental" dies used as well as Spellbinders Labels 4
Here is a sideview to show the dimension:

And a close-up to show the colouring details:


Now gather up a big huge pile of snow, and get ready to throw a snowball at CRYSTAL, cuz she's the next blog on the hop.  "DUCK CRYSTAL!!! INCOMING!!!"

Wags 'n Whiskers Challenge: Be Inspired!

Be inspired a front


I am hosting the challenge over at Wags 'n Whiskers this week, and I chose to encourage everyone to "be inspired". Use someone else's creation to inspire you! Give them credit for the inspiration and link us back to their project so we can see their artwork too. You don't have to copy every detail on their work, but you can if you want to!  Just be sure to give them the courtesy of the credit and the link; that's only fair, right? ;-)
Today I chose to be inspired by Bev Rochester of "All The Things I Love" .  I am a huge fan of her work and have CASED her on more than one occasion!  I just love the way she uses embellishments to their maximum potential. 
if you click on the link to her blog, scroll down to the fourth photo to see the one I used for my inspiration.  
 I chose to use "Bear Hug" for my main image today.  I stamped it on Manga Drawing Pad in Memento Tuxedo Black ink and coloured with the following Copic markers:  
Background and wings: R000, 00, RV00
Bear paw pads:  R81, 83, 
Cheek blush and lips R22,  
Sash trim and bow: R37, 59
Skin tones: E000, 00, 01, 04, 11
Blonde Hair: E30, 50, Y28
Bear: E30, 31, 33, 34, 37, 39, 49
Dress: BG23, 32, 34, 72, 75
Ground shadow: W3
Shadow on wings: C3
Blender pen throughout


I did some sponging around the edges of the image panel with a brown Distress Ink (again, not here with me so I don't know the name, oops!)
I put two layers of Ultra Thick Embossing Powder on the main panel and then put it in the freezer.  About ten minutes later I took it out and immediately bent it so it would get the cracked glass look.  Its hard to tell in this photo so here is another one where you can see effect of the cracked glass technique:
Be inspired angle close


And here is a close-up of the coloured image:


Be inspired c close


The Wags 'n Whiskers Divas have been busy creating cards for this challenge so check out all their beautiful creations, and Be Inspired! (there's a complete link list to the Design Team on my right side bar).


Be sure to come back tomorrow, as I have something very exciting in the works... and I mean VERY! You will NOT want to miss this!!
That's all I'm saying!

Sunday, January 17, 2010

Whimsy Carousel Horse: Cool Ride

blue and white afront


I was so happy to be able to create a card today with my "Cool Ride" stamp set I drew for Whimsy. I think it's one of my personal fav's so far. Plus I am also excited to enter it into three challenges today!


1) Stamp Something challenge this week is a colour scheme: blue and white.
2) Everybody Art challenge is "snowflakes"
and
3) Fussy and Fancy challenge is "winter"
I think I hit all three themes with this one card all right! ;-)


blue and white


I coloured Cool Ride with the following Copics:
B24, 28, 41, 45 91, 93, 95 ,97
BV23, 31
E11, 13, 15, 17, 42, 74,
C0, 2
YR000, 20
blender pen


See the post below this one for tips on how I do the dotty background.
I made the two blue patterned papers myself using the two accessory stamps that come in the set. I stamped the snow swirl around the outer edges of the main panel in Memento Summer Sky ink. I stamped the snowflake accessory with Whisper White onto the royal blue card stock. For the light blue panel, I stamped both accessory images onto white card stock in Versamark Clear, embossed in clear powder, then sponged it up with Summer Sky. Afterwards I removed the embossing using an iron and copy paper.
Many thanks to Yvonne, who inspires me to make more beautiful cards!
Hope you are having a great weekend! Enjoy it while it lasts!
God bless you, thank you for coming by for a visit!


Sunday, January 10, 2010

Kraftin' Kimmie Blog Hop!

Blog Hop Candy Contest now closed. Winners announced on the Kraftin' Kimmie Blog!!
DSC01046


If you have come here from Elaine's blog, you have landed in the right spot! Today marks the release of the new January images from Kraftin’ Kimmie Stamps!  I have 4 new fairy images which I really enjoyed drawing.  Also, there are 4 new fun and funky images from Annie Rodrigue, and 4 adorable images from Jean Grant as well as two new sets of coordinating sentiments. You’ll get to check out all the images throughout this fabulous blog hop!
If you want to start from the beginning of the hop, just head over to the Kraftin’ Kimmie Challenge Blog.  All the Krafty Girls plus two of her Krafty illustrating artists (me and Annie, to be exact!) are participating in this hop, as well as a few guests too.  And we've posted links to the next person on the hop to make it easy for ya.  You'll get to feast your eyes on sixteen samples from the new release if you do the entire hop!  As you hop from blog to blog, be sure to leave a comment at each and every stop - that will give you sixteen chances to WIN some blog candy!  Kimmie is giving away packages of stamps from this new release to three lucky commentors who have left comments along the way! 
And when you’re done hoppin’, be sure to head over to the Kraftin’ Kimmie store, because ALL the new images are NOW available!   PLUS, Kimmie has a special on right now that lasts through to Monday. 
  If you want to get hopping right away, I'm sending you over to- Nikki's blog, as she's your next stop on the hop.  Go see what she made with one of the new release images!
  Here are the colours I used on Bird Fairy .   Card details listed underneath the close-up photo below:  
YR0000, 000
Y26, 28
N0,1, 2, 3, 5
C5
R22,81, 83, 85
G21, 24, 28, 29
E00, 02, 04,11,15, 30
B93
BV23 
Colourless blender

DSC01041


Edited to add card details:


For the background that looks all dotty, I used the brush tip of whatever colour I used, and made different sized dots.  To make larger dots, I pressed harder.  To make smaller dots, I just didn't press as hard.  I tried to mix the size of the dots randomly so as not to form a specific pattern.  However, I did loosely follow the outline of the image and drew it out into the background.  You can really see that just above her feet and around the bird.  I made a dot pattern that mimicked those shapes.
   I used light colours in close to her body (like N1, 2, 3, B93) and then really light colours as I got further away from her bod (YR000, 00, N0).   Underneath her, I wanted darker shadows, so I used N5.
It really is not difficult, it only takes patience to cover the whole area one dot at a time.  I am guessing it took fifteen minutes to do all those dots, but I really didn't watch the clock so I'm not sure.  I kind of get lost when I'm colouring, and time just stops.  I love it so much that I don't pay attention to how long it takes.  I just enjoy making something beautiful.
   The pink swirls are from a Cuttlebug die I have.  It is a whole plate with several die cuts on it, including a large tag, a medallion and two borders. It is one of the borders that I trimmed in half and placed on both sides, but I tucked some of it behind the image so thats why you don't recognize it.  Plus I thought it was overkill with the swirls, so I actually ripped some of them off! lol.  I was hoping no one would notice the tear marks, but I guess I hid them in behind the panel well enough!
 As to my use of the  Frameability, please don't credit me for that!  I saw it on Yvonne's blog first and took a look at her tutorial, then made my own tweaks for this project.  Talk about jaw dropping moments, if you haven't seen her blog, please do!  Right now she is influencing every card I make!  I go to her blog, find a card, put it up on my screen and mimic a lot of what she does (or at least try to!).  I put my own spin on it, but really I try to emulate her a lot. Here is a link to her beautiful blog: http://yvonne-anabelle.blogspot.com/

Thanks for coming by today! I hope you win some blog candy! Bless you! 

Saturday, January 9, 2010

New Squigglefly Release!

 DSC01058


Squigglefly is releasing images every Saturday now!  I won't always have new images going up on the site every Saturday, but I do have a couple new ones today.   Last week I showed you a video demo of me colouring with Herbie the Bunny and today, I present to you...
drum roll please... duh-duh-duh-duuuuh...
 Mort the Frog.
Mort is a Prince Wannabe so he is wearing a crown.  I think you gotta kiss him if you want to see his Princely side.  Ew, gross, I know.
I drew the frog and crown separately, so that the crown can be resized, printed, coloured, cut out and used on any character image you may have.
 The images are up on the site already so you can purchase them today!
  In case you didn't know, you can shop by artist on the site too, so if you know you like any particular artists' work on SF, they have made it easy for you.   Just click on the "shop" option at the top of the page, then scroll down and you'll see "By Artist", with a list of all the illustrators.  Click on any of the illustrators for a complete list of their work for SF.  Here is a quick link to all of the illustrations I have done for them thus far.
 DSC01054
After printing Mort and his crown with my inkjet printer on Manga Drawing Pad paper, I coloured them with Copic markers.  I then cut both images out.  Mort does have two slender eyelashes on his eyes, and I did not cut them out! Instead I just redrew them onto the crown after I had pasted it on (much easier than cutting around those tiny, thin eyelash lines!).
  To get that bumpy lumpy look to his skin, I went over the whole thing with my colourless blender pen, just dabbing it by the brush tip and holding it down to the paper for a few seconds with each dab.

You don't move the blender pen around.  Just hold it still until you start to see the ink spreading out from the tip. It really is cool to watch it work!
  Lots of Spellbinder dies used, a Martha Stewart Edge punch, and I inked the edges of some panels with Black Soot Distress Ink.  Gold Stickles on the crown.
Here is a list of colours I used on Mort:
YG00, 25, 67
R27
RV13 (his blushing cheeks)
colourless blender


And on the crown:
Y26, 28, YG25 R27


 Lots of the SF Design Team have samples up on their blogs today, so go check them out.  For a complete list of the DT, go to the SF blog -- they're listed on the sidebar.


Don't forget, tomorrow is the big Kraftin' Kimmie Blog Hop, and I'm participating in that too.  So come back and join the fun!  You might even win a prize if you're lucky!
God bless you, and thanks for coming by today!


PS  Don't ask me how the fonts changed on me, I have no idea.  And after about twenty minutes trying to fix it, I gave up.  Oh well, you are getting a variety of fonts and sizes of fonts today! 

Friday, January 8, 2010

Kraftin' Kimmie Sneak Peek!

DSC01031


Here is a sneak peek at one of the new images I illustrated for Kraftin' Kimmie Stamps. She is Forget Me Not Fairy and I hope you like her! Kraftin' Kimmie's new release takes place this Sunday Jan. 10. There will be a blog hop that day as well, with prizes to be won, so be sure to come back! I will be participating in the blog hop again (they are always so fun!). 
Check out all the other sneak peeks by visiting the Kraftin Kimmie Blog, where Kim has posted the links to all participating Krafty Girls. 


I have only participated in two challenges since I started blogging well over a year ago! But I would like to give it a go this year. I think it will be rather fun for a change! Plus challenges can really spark creative flow when you don't know what direction to take your project. So, here are the challenges I had in mind when I made this card:


Cute Card Thursday -- Something New. Kraftin' Kimmie stamps is this week's sponsor and I was lucky enough to have my card featured on the CCT blog! I consider that an honour! My something new is the image of course - so new it is not even released yet! Be sure to check out the CCT blog to find out how you can have a chance to win THREE KK images of YOUR CHOICE!

ABC Challenge -- "L is for Layering" And as you can see, there are a ton of layers on this card!

Flutter By Wednesday's Challenge 91 -- Something New. Ok, so you know the fairy stamp is new but so is my Basic Grey paper that I used, recently purchased from Scrappin' Great Deals (LOVE that store!).


A Spoonful of Sugar -- Hearts. I used the gorgeous heart dp by My Mind's Eye as a base layer for this card.


Creative Card Crew -- Distressing . I distressed some of the layers by running the edge of a metal ruler on them. I love how it brings out the white core.

I colored Forget Me Not Fairy with the following Copics:

E000, 00, 02, 04, 07, 08. 09, 11, 19
R0000, 000. 00. 81.83.85. 89
YG03, 41. 63.67
FY1 - flower centers
B63.66 - flowers
BG93
G0000. 40
C2
I made the colored background by creating individual dots of various sizes with some of the lighter colors. Then went over them later with the colorless blender to really mottle. blend and fade the colors.

DSC01036


Tomorrow if all goes as planned, Lord willing, I will be back with a card made from my new Squigglefly release, and then on Saturday, there's the big Blog Hop with Kraftin' Kimmie, and she has lots of goodies up for grabs! Hope to see you then!
Take care and God bless you!
PS Thanks for the inspiration, Chris D.! xo

Sunday, January 3, 2010

Whimsy Blog Hop and New Release! Blog Candy to be won!

untamed love cardfront

Congratulations! You've come to the first stop on the Whimsy Blog Hop today, titled:

COME TAKE A RIDE WITH US

Did you ever ride the carousel as a child and daydream that you were on your very own horse, running through the woods? Or perhaps, as the carousel gently lifted you up and down, you pretended you were riding along a sunny beach and your horse was leaping over rocks and splashing in the waves. As a child I had a vivid imagination! But the carousel was and still is my favorite ride at the fair. That's why I am so pleased that Denise encouraged me to re-visit cherished memories of the carousel and illustrate this new line of stamps for Whimsy!

This blog hop starts today and CLOSES SATURDAY JAN 9 AT NOON. Whimsy Stamps is offering up a yummy prize to one lucky randomly chosen person who enters the draw! To be enter, all you need to do is go to the Whimsy home page and type in your name and blog link with Mr. Linky. Those of you without a blog can still enter! Just proceed to use Mr. Linky and type in your name, and then copy and paste the Whimsy site address where it asks for your blog link address. Make sure you check back next Saturday on the Whimsy blog to see if you won! In the event the winner is someone without a blog, they will need to contact Denise because she will have no way to contact them.

Now just LOOK at the blog candy Whimsy is offering:

- of each of the new stamp sets for a total of 2 main image stamps and 4 accessory stamps
-an assorted packet of 6 x 6 papers
-spool of ribbons
-misc. embellishments


I have illustrated two sets of stamps, each with one carousel horse and two small accessory images. On my card I have used "Untamed Love" which is appropriate for Valentine's Day but can also be used year round for any occasion. The other set is titled "Cool Ride" and also has a couple of small accessories to complement it. BOTH SETS ARE AVAILABLE TO PURCHASE NOW! And Whimsy stamps are the highest quality deeply etched red rubber, mmmmm. Not to mention FAST and FRIENDLY service!

I don't normally use this many die cuts on my cards (at least not all at once!) so I MUST give credit to another stamper who inspired me to use Spellbinders dies this way. Shet also posted a tutorial that I followed. Yvonne's blog is something you really have to check out: Her work makes my jaw drop to the floor every time I see it. Unbelievable beauty is found there, in abundance! Here is her tutorial for making the frame that I have used on Untamed Love.
I colored my image using Copic markers and made the background using lots of dots made with the brush tip. I also sponged some Distress inks around the edges too.
Here are the colors I used:
RV21
R000, 32, 37, 39
B02, 04, 21, 23, 91
BV13
E40, 42, 44, 47, 49, 51
G02, YG63

Do you want to see what everyone else on the Whimsy DT created with the new release? Your next stop on the blog hop is Ann's blog. Go have a look at her creation, and she will direct you to the next blog from there. I hope you enjoy your ride with us on the carousel today! God bless you!

untamed love closeup

untamed love inside

Friday, January 1, 2010

Copic Creations Guest Spot, New Squigglefly Image, Video Demo!

DSC01008
Happy New Year everybody!
I'm starting off the New Year with the prestigious honor of Guest Designer for the Copic Creations blog! The very kind and talented Mary Giemza, owner and moderator of Copic Creations approached me a little while ago to see if I could help with this week's theme; how to render fur with Copics. I was really excited about this offer and jumped at the chance!
If you haven't seen Mary's blog, you are truly missing out, and I suggest you go check it out now! You won't be disappointed! Also, every artist on the Copic Creations team is fantastic, each and every one of them, and it would be well worth your time to visit them too.
I got so excited about joining in this week that inspiration hit... so I drew a new illustration to help me demonstrate this technique. "Herbie" the bunny hopped out of my pen ready and rarin' to go! He is a digital image and will be available to purchase at Squigglefly this Saturday, Jan 2.
Now I have had it in the back of my mind to do up another video demo for you, and I got some time over these holidays to do just that! My DD Ashley was my camera operator, and she edited the video in iMovie on my Mac. We had a blast giggling together as I colored and she video-taped! I hope you will laugh along with us as you watch our video creation on how to render fur with Copic markers!


DSC01008_2

Thanks for visiting, and may your New Year be filled with blessings and your heart full of PEACE!