Friday, January 30, 2009

Jan POTM and TLC205 on Splitcoast


Well, January is almost over, but it is not too late to purchase the Project Of The Month stamps on sale right now at High Hopes Stamps! You still have until Saturday the 31st to save 25% off the regular price!
Now this month they are featuring the tooth fairy set, with lots of toothy-type accessory stamps, but I chose to make a valentine with the main image only to show you that she can be a versatile little angel fur shur! ;-) Be sure to check out other great sample cards and special projects made by some of the other Divas over at the HH blog. Some of the gals made uber cute boxes for little girls to use to hold their lost tooth in, with satchels for the money to go into! So cool!
On Monday Splitcoast's Technique Lover's Challenge had us using paper pleats on our cards. I used them in two places; inside her purse and below the main image panel. I used an exacto knife to cut the top edge of her purse so I could fit things inside it. (If you are using her as a tooth fairy, it can help you make a money card, cuz you can cut the top of the purse and slip in some dollar bills or coins if you're on a budget =D ) I didn't like how it ended up looking (too plain) so I added some narrow pink ribbons as well, which kind of hides the pleats! The pleats along the bottom of the main image were supposed to curve in both corners, but alas I didn't get them to curve upwards enough on the left side so they kinda look lopsided, unfortunately. Ah well, the lady who receives this isn't going to care, she will be just happy to feel all my Valentine LOVE!!! heh-heh!
I watercolored the angel using Tombow pens and water. The panel she is on as well as the largest panel were done using Embossing Resist.
I doodled around the edges and added lots of glitter glue to her wings and wand, and Spica glitter to her slippers and bow.
Thanks so much for looking today, and BE BLESSED in HIS (DADDY GOD'S) LOVE TODAY!
Tuesday, January 27, 2009

Hearts! HHC15 + Zoe's blog candy!!

I've edited this post to include a link to Zoe's blog where she is offering blog candy! Check it out here!
This week over at the High Hopes Blog, the challenge from Janette is to use hearts somewhere on your project. Simple and easy and great because Valentine's is coming up fast! Though my first card is a birthday card, not a Valentine. Don't matter, a heart means love, and that is for anytime and all the time!!
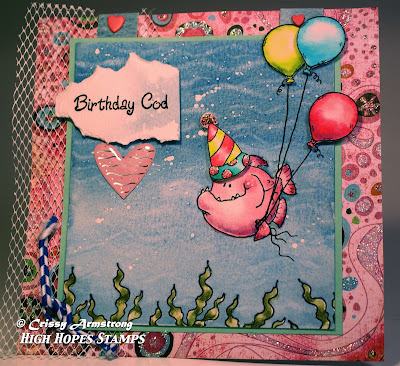
I love making underwater scenes and this one is for a sweet lady I know, and so it had to be all girly pink! I am really into using my watercolors on cards lately, and so I spent a lot of time on this one.
First, I stamped Big Lou Piranha onto my Canson watercolor paper using Versafine Onyx Black ink. Then I stamped the seaweed randomly at the bottom edge of the page. Next I painted over Big Lou and the seaweed, completely covering them in painter's masking fluid. Masking fluid is like this milky liquid that dries to become a film overtop of whatever you paint it on. It keeps the paint from soaking in where ever you don't want paint to go. I also splattered some of the stuff all over so that later after I painted on the water, I would have white spots that would look like oxygen bubbles in the water.
So after the masking fluid was dry enough (roughly fifteen minutes), I mixed up a water color using aquamarine blue and cerulian blue paint. I thoroughly wet the paper and then painted wet into wet all over, until I was happy with it. You have to realize that watercolor paints dry to about fifty percent of the color intensity when wet, so always paint darker than you need. After the blue dried, I used a small round brush dampened with water to remove paint in thin wavy lines all over, to make it look like reflections from the waves above.
I then peeled off the dried masking fluid. I got it going with my fingernail and then just peeled it back. When dry its like a thin film of stretchy plastic!
I painted the fish and seaweed, and then made my card. The pink heart is a sticker I got from a sheet at Dollarama! The netting was from a bag that held garlic! lol, no, it does not reek of garlic! The blue and white "marine rope" was from a spool I got at Michael's.
I also altered the background designer paper by putting Stickles all over it so it really sparkles! (thanks Janette!). The idea for that came from the "Ways To use it Challenge" on SCS. Balloons are watercolored, cut out, and popped up. Balloon strings are drawn in thin permanent liner marker.


I stamped the Kissy Face Frog onto watercolor paper and a second one on a post it note. Cut out the post it note frog and used it as a mask, then stamped mushroom one. I painted the scene with watercolors, then drew a heart shape and cut it out by hand. I drew a second one using the red cs. Of course since it was done by hand and not a die cut, there were a lot of imperfections. I hid those by distressing the edges with my metal ruler! I love how distressing hides flaws!!
The sketch for this card was last week's sketch challenge on SCS, and the color scheme was also their color challenge. I used stamps from the Jeanne Streiff collection on the background panels. I couldn't find a link for them.
Be sure to check out all the samples for this week's challenge over at the High Hopes Blog, and remember that you will have a chance to win two free High Hopes Stamps if you join and link your art on the challenge post!
God bless your day, and thanks for stopping by!

Tuesday, January 20, 2009

TLC204


This card is for the Technique Lovers Challenge over at Splitcoast Stampers today. We had to make a Faux Mosaic pattern. It was challenging for sure! Took me three tries to get a good one! Had to use my good quality double sided tape. The cheap stuff curled when heat was applied. For a tutorial on the technique, check out the first post in this thread. It really wasn't hard once I used the right materials!
Heloise Hippo was fun to watercolor, esp doing the ground and grass. I am happy with how it turned out. I used Twinkling H20's on the balloons, and artist quality paints on the hippo and background. Balloon strings were drawn on last with a black ink pen.
Thanks for stopping by today!

Sunday, January 18, 2009

HHC14 Dude Card, plus SC211!


There's another great challenge taking place over at the High Hopes Blog starting today! This week's challenge is to make a "dude" card, in other words, a card that could definitely be given to a male without making him uncomfortable or feel threatened with lace and flowers and girly girl stuff, if you know what I mean! =) Niki, one of the wonderful Divas (linked on the right side bar) is the hostess for this challenge. The two cards below are my samples for the challenge.
Don't forget that every week, Tina, owner of High Hopes Stamps offers blog candy for one lucky winner! If you enter the challenge and link up a photo of your creation on the HH blog, your name gets entered into the draw!
I am approaching cardmaking differently these days, in that I am aiming towards turning my images into miniature watercolor paintings with each card. I am taking more time on the backgrounds and giving the color more depth than I used to. I am trying to anyway, and I still have a long way to go, but its fun to expand my horizons a bit. I am getting a lot of inspiration from Sirpaliina's wonderful art. If you've never seen her work, I encourage you to go visit her blog. Its like walking through an art gallery!
I made this card for my hubby Mike (he doesn't know it yet, nor has he seen it... I'm waiting for the right opportunity to give this to him! I might just wait til after his first fishing excursion this spring!).
I stamped Norman twice and cut out a mask, masked him and then used fillable beach scene, though I didn't ink up the sand castle so that it would not interfere. I had to draw a couple more sand bumps and add a few more sand dots with a marker under norman's feet. I didn't ink up one of the clouds in the sky either, I just preferred it to be simpler.
I also used the Great Escape for the lobster trap in the corner.
I watercolored all the images with artist quality paints. The sketch for the card came from this week's Sketch Challenge over at Splitcoast Stampers.

I stamped Matchmaking Maynard with Versafine Onyx black, watercolored him and cut him out. For the sky background, I did a watercolor wash, using a wet into wet streaked wash technique. Its done by using a very wet page, lots of water and pigment in your brush, and by adding random stokes of color. Then you pick the paper up and turn it this way and that, to get the pigment flowing in various directions until you are happy with it. Its a subtle way to make clouds appear in the sky and keeps the blue of the sky looking smooth, without showing brushstrokes. The trick is to have your paper wet, but not with puddles of water, or you will not get this smooth looking result. Try it, its fun and after a few tries, you will get the hang of it!
Thanks for looking today! Now you go and make a dude card, and link it up on the HH blog so you can have a chance to win sum rubbah!!!

Wednesday, January 14, 2009

Scs Sketch Challenge #211


I made this card for the SCS sketch challenge today. I felt like dusting off an oldie but a goodie. I stamped then masked Bear-ly Warming Up on watercolor paper. Then I stamped Snowy slopes overtop, and repeated the trees from that stamp to the left of the bear. I hand drew the rest of the hill in the background to fill it out to the edges.
I colored the images in with artist quality watercolors. I got the idea for a little scroll for the saying, Warm Winter Wishes from Michelle, aka "flaxychick over at Splitcoaststampers. I had to stamp each word one at a time because the saying is actually across, not one word atop the other. I need to work on that scroll idea though. I love it but mine is missing the papery distressed look she achieved. I love her cards!
When I was done coloring the image, I sponged Versamark Clear overtop the whole thing, and added Ultra Thick Embossing Powder (clear) and heat set. I had to do it three times to get a totally smooth finish. I love the glossy look it gives the image.
I used Martha Stewart's Carrara Marble powder for a snowy look around the edges of the main panel and a bit on the mitts, trees and snowflakes. I added Stickles to the red portion of the mitts, and Spica pen to the wording for a bit of sparkle. The glitter on the snowflake is Diamond Dust (crushed glass actually!).
Main image and scroll are popped up on double sided foam tape from the hardware store (its a lot cheaper and works just as well as pop dots!)
Thanks for looking today!
God bless you!

Thursday, January 8, 2009

For WT200 on Splitcoast


I did this for the Ways To Use It Challenge over at Splitcoast. Today we had to use stars somewhere on our project. I used some background paper that had stars on it designed by Sandy Lion.
Though she didn't do her card for this challenge, I was inspired by Anna's card here
I watercolored the images with Twinkling H2O's. Lots of sparkle glue on the party hat and I added a gloss medium to the balloons, though the photo didn't pick it up. Its a medium that you can find at any fine art supply store. They sell it by the jar full. Mine is Curry's own brand, Tri-Art Self Leveling Gel Gloss.
Balloons are stamped and cut out. I tied thread around the balloon ends. Using an exacto knife, I cut into the hoof and inserted the threads and fastened them down with glue tape. That was actually the trickiest part to the whole thing!
All images by High Hopes Stamps. Thanks for looking today!!

Wednesday, January 7, 2009

Another one for HHChallenge 12


Another card for the HH Challenge 12. I watercolored this one too, with my artist paints. The dark blue paper is actually faux leather paper that has a vinyl coating. It is white under the vinyl so it shows up as a nice contrast when torn. I used an older stamp, Catching Snowflakes, that is one of my favorites from High Hopes. I drew in some extra falling snow to fill out the background. I colored the snow flakes with a white gel pen. There is Twinklets Diamond Dust glitter on the Martha Stewart punched snowflakes. Thanks for looking today!

Saturday, January 3, 2009

HH Challenge 12: Tearing


My first card and first post for 2009! I am happy to be back into the swing of things. I love routine. The challenges have started back up again over at the High Hopes blog! I decided to host the first one of the new year, and the theme I chose is tearing. If you want to join in the challenge, just make a card with tearing somewhere on your project. Simple, eh? I love the effect; esp. when the core of a paper is white or black; you get such a stark contrast that really shows up well. If you join in the challenge, be sure to leave a comment and a link to your creation on the High Hopes blog so that your name can be entered in a draw to win two free stamps from High Hopes Stamps!!
Well, this morning I finished up the last of my drawings for the new release due in early February for High Hopes! I'm excited to share all of those with you, but that will have to wait til Feb! But now that I'm done the drawing, I have some time to make cards again! I wanted to make a winter theme card and so I used a stamp I designed for them awhile ago. It is one of my personal fav's.
I got so inspired after I took a walk through the blog of one of my fav. card artists - Sirpaliinan. If you haven't been to see her creations, you are in for an eye popping treat. I wonder if she is a professional storybook illustrator or something, because each of her cards looks like a page from a book. She has just an amazing handle on how to use color to its fullest advantage. I only wish I could read her blog entries; they are all in Finnish! Anyway, I studied her winter cards for awhile, and then came up with this one today.
I stamped Follow The Stars using Versafine Onyx Black ink on 140 lb. cold press Canson water color paper. To color, I took out my artist quality paints and only used those. I drilled holes with my paper drill from Lee Valley Tools and used waxed cotton cord to sew the layers together in places. I put Twinklets Diamond Dust on the snowflakes for some glitter. That stuff is awesome! It's actually crushed glass and I love how all the pieces are different sizes. I also love how it's clear so whatever is underneath shows through. Anyway, I had a lot of fun making this card. It looks like a scene from my back door these days, except we have trees (and our bears are black, and fast asleep for the winter)!
Thanks for stopping by today! Happy New Year to you!
And this year, I pray you find out how much God really loves you! Cuz He sure does!